
Sunday, December 26, 2010
Wednesday, November 10, 2010
Modeling for Make-up workshop
The make-up artist
Not only woman like make-up. A friend of mine, Alexander Vidakovic is a male make-up artist. He turned is living room into a make-up and photo studio. It is named: studio Artist X. It is his work and hobby so actually it is his life.
He traveled around the world for 5 months with is suitcase filled with make up to do the make-up part at photo shoots. After he came back in the Netherlands he decided to start with make-up workshops, to learn to others what they can do with make-up.
The workshops are for everyone who wants that. People who are a bit experienced like beauticians or just people who wants a nice day to find out what they can do with make-up. If you want to do a make-up workshop yourself, go to the website Visagie Workshops there you will find al the information you need to book a workshop.
My day as a model
When Alexander needed a model for one of his workshops, I said why not. So there I was on a Saturday afternoon about two weeks ago. Sitting on a stool to be a make-up model.
The person who took the workshop was Elisa she is a beautician and has her own salon. She wanted to learn to do some make-up because people at her salon ask for that sometimes. She wanted to learn how to do evening make up.
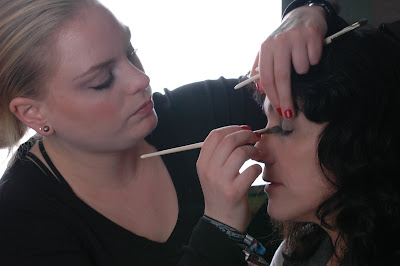
First my faced face cleaned and moisturized with day cream. After that the real work started. Choosing the right colors of concealer, foundation and powder. What Alex does very well, he first showed Elisa how she had to put it on my face after that she could apply it on my face. I could see from here face that she was learning a lot. Alexander gave here lots of very good tips about applying make-up and also about the use of colors.
In the photo you see Elisa putting concealer on my face:

After that it was time for the eyeshadow. Because it had to be evening make-up, she choose from the purple color palette. Purple colors are working very well if you have blue eyes like I have.
A white highlighter just right under the eyebrow gives you that wakey,wakey look that everybody wants to have.
After putting a two tones Kohl liner on my lower eyelid in purple and black, some mascara on my lashes and a bit of gloss on my lips, my face was done. It looked really stunning!
Me with the make-up on my face:

As you can see the photos have a very professional look, thats because of Alexanders own photo studio. If you decide to do a workshop, a gratis fotoshoot is also what you will get. of course on professional level!
Because there was time left, I also did a workshop. I never had that done before, but I must say I am very proud of myself and how it looked on the face of Elisa.
This is me applying make-up:
After the workshop, Alexander made some professional pictures. The one of me, you saw earlier in the article and pictures of Elisa and me that i will show you now. So You can see the great final result:

and:

If you want to know more about Alexander as a professional make-up artist or if you are interested in is work, or both, visit his web page Alexander Vidakovic Professional make up artist. Here you will also find a video of Alexander applying make up on models during a catwalk show.
Not only woman like make-up. A friend of mine, Alexander Vidakovic is a male make-up artist. He turned is living room into a make-up and photo studio. It is named: studio Artist X. It is his work and hobby so actually it is his life.
He traveled around the world for 5 months with is suitcase filled with make up to do the make-up part at photo shoots. After he came back in the Netherlands he decided to start with make-up workshops, to learn to others what they can do with make-up.
The workshops are for everyone who wants that. People who are a bit experienced like beauticians or just people who wants a nice day to find out what they can do with make-up. If you want to do a make-up workshop yourself, go to the website Visagie Workshops there you will find al the information you need to book a workshop.
My day as a model
When Alexander needed a model for one of his workshops, I said why not. So there I was on a Saturday afternoon about two weeks ago. Sitting on a stool to be a make-up model.
The person who took the workshop was Elisa she is a beautician and has her own salon. She wanted to learn to do some make-up because people at her salon ask for that sometimes. She wanted to learn how to do evening make up.
First my faced face cleaned and moisturized with day cream. After that the real work started. Choosing the right colors of concealer, foundation and powder. What Alex does very well, he first showed Elisa how she had to put it on my face after that she could apply it on my face. I could see from here face that she was learning a lot. Alexander gave here lots of very good tips about applying make-up and also about the use of colors.
In the photo you see Elisa putting concealer on my face:

After that it was time for the eyeshadow. Because it had to be evening make-up, she choose from the purple color palette. Purple colors are working very well if you have blue eyes like I have.
A white highlighter just right under the eyebrow gives you that wakey,wakey look that everybody wants to have.
After putting a two tones Kohl liner on my lower eyelid in purple and black, some mascara on my lashes and a bit of gloss on my lips, my face was done. It looked really stunning!
Me with the make-up on my face:

As you can see the photos have a very professional look, thats because of Alexanders own photo studio. If you decide to do a workshop, a gratis fotoshoot is also what you will get. of course on professional level!
Because there was time left, I also did a workshop. I never had that done before, but I must say I am very proud of myself and how it looked on the face of Elisa.
This is me applying make-up:

After the workshop, Alexander made some professional pictures. The one of me, you saw earlier in the article and pictures of Elisa and me that i will show you now. So You can see the great final result:

and:

If you want to know more about Alexander as a professional make-up artist or if you are interested in is work, or both, visit his web page Alexander Vidakovic Professional make up artist. Here you will also find a video of Alexander applying make up on models during a catwalk show.
Skinny or curvy

What does the modeling business want? First models had to be skinny, that went form heroin chic to anorexic and even models who died because of the size zero standard on the catwalk. And then there was that big change. I think it started a couple of years ago back in Spain where girls with a BMI less than 18 where boycotted.
Now days the plus size models are the rising stars. Every high fashion magazine brings out an issue dedicated to them. It's good to see that things can change and that curves are appreciated again just like back in the golden years of Hollywood.
What I don't get is one thing, why only size zero and plus size models. What about the woman who do not have that size. A skinny models has to have (in Dutch sizes) size 32-34. The size of a plus size model starts at (in Dutch sizes) 44. So what about the sizes between that? I don't understand. Why is it almost always like you can only go left or right? If you see it in black and white, you have or to loose weight or gain a lot if you have a (Dutch size) size 38 like me. There are a lot of Campaigns that says that a woman can be who she is and more stuff like that. I think it will work if the modeling industry decides that all sizes are ok. Not only a skinny Victoria Beckham or a Curvy Christina Hendricks, but all of us, people like you and me.
Saturday, October 16, 2010
E.L.F. Cream Eyeliner
For years now, I use eyeliner. I used almost every type of it, dip-liners, felt-tip eyeliner pen, pencil-liners and so on. When I was shopping at ELFs website, I saw a new sort of eyeliner. cream eyeliner. It reminds me a bit of cakeliners. I decided to give it a try, so i bought it.
This is how it looks:

As you can see it comes in a tiny plastic jar, I think it looks stylish. The little brush you see on the picture is included.
I was a bit nervous to try it. And I must see it took my about 15 minutes to get it on my eyes the way i wanted. Probably because of this was the first time ever i tried a eyeliner with brush applicator.
To get it on nicely, take your time and do not try to rush, that will not work. Also, it dries very quickly, so be sure to have a cotton-tip and makeup remover near to you, else you will not be able to get it of. It is really smudge, rub, and waterproof. See the picture, the left line is with a lot of rubbing the right one with a bit and also that line was already dried up.
To remove the eyeliner, use some eye makeup remover. Also do not forget to clean the brush, it will get sticky if you not remove the creamliner form the brush.
After a whole evening of wearing this, no smudge and the line was still in place.

On my eyes it looks like this:

Likes: no smudge, waterproof, good deep color
Unlikes: the time it takes to put it on(but that is my opinion), a bit sticky if you leave it to long on the brush before applying.
Go/no go: I give this one a go. More likes than unlikes. I like this liner and will use it more than once.
You can buy it at E.L.F. make up The price is 4 euro. It is available in 8 colors.
Thursday, October 14, 2010
Favourite Red
My favourite red nail polish: Maybelline #15 Candy Apple. No other nail polish will ever defeat that one! (but that's my opinion);)


Saturday, October 9, 2010
ELF Hypershine mini lip gloss
In my last post you could read about the ELF products that I've bought. Here is the first review. It is about the lip gloss set. Since I could not decide which colour I had to choose, I decided to buy the set of eight mini lip glosses. So now I have all colours, happy me.
So what do you get? eight lip glosses, the colours are: Fairy, Blossom, Joy, Flirt, Sugar Plum, Cloud Nine, Honey en Vixen. The scent they have is a cotton candy(that's what the website says) . Included is a mobile phone slot, so you can take your favourite colour with you and change it to another one when you want to.
Here is a picture of the 8 glosses with the mobile phone slot

I also tested them on my hand so that you can see the colour on human skin. These are the first four

And this the second four

As you can see, some don not have sparkles other ones have a light sparkle and there are also a couple with bigger sparkles.
On your lips they feel fine. Not sticky or runny and they taste fine. The price of the set is: €5.80. You can also buy all of these lovely little ones in regular size. Buy them at: eyeslipsface
New ELF make-up
Have you already heard of ELF make-up? ELF stands for: Eyes, Lips, Face. You can buy almost every sort of make up you wish. They have three lines, a regular line, a studio line and also mineral make up. All three of them have a big range and are totally inexpensive. Most of the prices are between €1,70 and €4,50. Also good to know, none of their make-up is tested on animals.
The first time I ordered make-up from them was somewhere of July this year. I really liked it so I decided to buy some more make up. This is what I bought:

In the photo you see: 2x All over coverstick Ivory, cream eyeliner black, therapeutic conditioning lip balm Vanilla Crème, hypershine mini mobile lip gloss charms and Brightening Eye Color Blue Moon.
I will do some reviews of the products in the next couple of days. If you want to buy make-up from ELF, go to the website: eyeslipsface.
You can also become a fan of them on facebook. There you will find nice offers like free shipping and more.
Thursday, September 2, 2010
The first week of the new school year
After a awesome summer break,I went to a couple of very nice concerts, a great festival and a super cool hackerscamp, it is time to go back to school. A new year, a new class with new people and new thing to learn. At the and of last school year I had to choose a direction. I decided to choose Technology, Design and Interaction(TDI).
This week we started with SQL and PHP. that are things I've already done when I was studying ICT. So it will be more like a fresh up for me then learning something new(I hope I will learn something new.)
Still have to earn 2 SRP points to get my propedeuse.
I also decided to write further on in English. So it is easier for more people to read.
Sunday, May 16, 2010
De Benefit Brow bar in Utrecht
Vorig jaar Juli, dankzij een gewonnen prijs van een tijdschrift, ging ik voor de eerste keer naar de Benefit Brow Bar in Utrecht toe. Bij de Brow Bar van Benefit kan je je Wenkbrauwen laten waxen en epileren. Ik was toen erg blij met het resultaat. Ik was dan ook erg teleurgesteld toen ik in Oktober 2009 een afspraak wilde maken, maar wat niet kon omdat er niemand meer werkte bij de Benefit Brow Bar. Na regelmatig gebeld te hebben en steeds nee te horen kreeg, belde ik op maandag 3 mei toch maar weer eens op. Eindelijk is de Benefit Brow Bar in Utrecht weer geopend. Benefit heeft Najat aangenomen voor de Brow Bar. Op donderdag 6 mei had ik om 8 uur 's avonds mijn afspraak.
Dit is de Benefit Brow Bar

Najat heeft erg veel plezier in haar werk. Ze nam heel uitgebreid de tijd voor me. Ze legde precies uit wat ze ging doen tijdens de behandeling van mijn wenkbrauwen. Ik voelde me erg op mijn gemak en Najat wist een erg ontspannen sfeer te creeeren.Ze zei ook dat ze vond dat ik heel erg mooie ogen had, omdat ze niet gewoon blauw waren maar een hele mooie kleur blauw. Ook kreeg ik een Benefit Bad Gal mini mascara omdat ze het zo lief vond dat ik helemaal vanuit Beverwijk naar Utrecht was gekomen voor een wenkbrauwbehandeling. Ik vind dat Najat haar vak er goed doet. Ze is heel professioneel maar ook heel gezellig, nam uitgebreid de tijd en weet goed hoe ze je op je gemak moet stellen. Wenkbrauwen waxen en eplileren is namelijk niet echt al te pijnloos. Ze zei dat ze best perfectionistisch is, en dat ze altijd probeert van wenkbrauwen tweelingzusjes te maken terwijl het eigenlijk zusjes zijn.
Ik vind dat mijn wenkbrauwen echt mooi gelukt zijn. Na het Waxen en Epileren, wer de huid rond mijn wenkbrauwen gecamoufleert met Boing Boing camouflage, wat ook nog eens antibacterieel is. Op mijn wenkbrauwen kreeg ik wenkbrauwpoeder, wat Najat uitveegde met een borsteltje voor een natuurlijk effect, onder mijn wenkbrauwen kwam een highlighter voor een opener gezicht.
Dat Najat het heel goed kan bewijst ook wel dat ik totaal geen uitslag of rode bultjes had na afloop en de paar dagen na het waxen. Iets wat ik in het verleden wel gehad heb.
Ik ben echt super blij dat Najat nu bij de wenkbrauwbar werkt, en ga dan ook zeker, als ik weer mijn wenkbrauwen moet laten bijwerken naar haar toe.
Voor dat ik naar de Benefit Brow bar ging heb ik een foto gemaakt van mijn wenkbrauwen, en na afloop heb ik dat ook gedaan. Hier de before and after foto's:
Voor:

Na met wenkbrauwpoeder:

Dit is de Bad Gal mascara:

Ook heb ik nog een heerljk parfum gekocht. Benefit heeft drie nieuwe parfums op de markt gebracht, Lee Lee, Gina, Sofia. Ik heb de Sofia gekocht. De fles is in de vorm van een cocktailshaker, de verpakking een huisje, echt zo leuk. Benefit had ook nog eens 25% korting op de producten, wat mooi meegenomen was.

Wil je ook graag eens een bezoekje brengen aan de Benefit Brow Bar? Ze zijn te vinden in Utrecht, Den Haag, Rotterdam en Maastricht. Om een afspraak te maken, kun je bellen met het desbetreffende Sephorafiliaal in die plaats. Sephora Vestigingen
Monday, May 3, 2010
Eyeko's 3 in 1 cream

Al een tijd lang gebruik ik met veel plezier de 3 in 1 cream van Eyeko. Graag wil ik met jullie delen wat de creme voor je huid doet en wat de eigenschappen zijn.
Dat de creme van Eyeko 3 in 1 heet, heeft natuurlijk een reden. De creme heeft er voor gezorgd dat je de creme voor meerdere doeleinden kunt gebruiken, namelijk als:
- Moisturiser
- Highlighter
- Eye cream
Dat houdt dus in, dat je de huid van je gezicht heerlijk kunt voeden, de creme op plekjes zoals je wangen of boven je oogleden smeren voor glanseffect, en als oogcreme om de huid onder je ogen mooi te houden.
Dat de creme dit allemaal doet, komt door de lichtreflecterende pigmenten, de antioxidanten en vitamine A en E die beide erg goed zijn voor je huid, als extra nog vitamine C.
Een rijker gevulde creme die ook nog eens alles voor je huid doet wat je nodig hebt, kan je naar mijn idee niet krijgen.
Om goed te laten zien hoe de creme er uitziet, heb ik foto's gemaakt van voor de creme, de creme op mijn hand maar niet uitgesmeerd en de creme wel uit gesmeerd.
Hand zonder Eyeko creme:

De creme er op, niet uitgesmeerd:

De creme uitgesmeerd, je ziet nu de glans op mijn hand(het is jammer dat je door de foto niet het effect ziet wat het in het echt geeft):

De creme is net als andere producten van Eyeko zeker niet duur. De creme is in 2 kleuren verkrijgbaar, voor een lichte huid en een donkere huid.Je koopt 'em voor het bedrag van €7.00. Kijk voor meer Eyeko op de webiste:
Bestel je deze week voor meer dan €11.00 vul dan bij de checkout commentbox FAT BALM in, deze krijg je dan gratis bij je bestelling, die ook nog eens vrij van verzendkosten is. Vul je ook nog mijn ambassador code: E2519 in, dan krijg je nog extra een leuke verrassing bij je bestelling.
Friday, April 30, 2010
School
Zo wat gaat het schooljaar toch eigenlijk hard, ik herinner mij de eerste week nog wel steeds eigenlijk met het IAM ON project. Nu zitten we alweer in het laatste blok van het propedeusejaar. Net het grote teamproject achter de rug. Is mooi geworden. Voor het eerst een klick and point game gemaakt. In het spel moet je vier stroomslurpers zien te vinden voordat je het huis mag verlaten. Wil je het ook spelen? kijk dan hier: http://jojo.etv.cx/klimaatstraat/escapegame2.swf
Makkelijke Pasta
Dit gerecht heb ik van de week gemaakt. Het is makkelijk te maken, goedkoop en erg lekker.
benodigdheden(voor 4 personen):
Zak pasta ongeveer 300-400 gram
1 bakje verse Soepgehaktballetjes
1 pot Tomatenbasissaus(met kruiden)
1 zak intaliaanse roerbakgroenten
zakje gerapste kaas
Bereiding:
Kook de pasta zoals aangegeven op de verpakking. Bak in een koekenpan of hapjespan de gehaktballetjes gaar. Voeg de groente toe, en bak deze mee. Giet de pasta af, doe de gehaktballetjes en groente samen met de pasta terug in de pan en roer de tomatensaus erdoor. Nog even doorwarmen en klaar is de pasta. Lekker met wat gerapste kaas erover.
Tuesday, February 2, 2010
Snelle en simpele roerbak
Weinig tijd en toch lekker willen eten? Probeer eens deze superlekkere roerbak.
Ingredienten:
300 gr. runderreepjes
400 gr. roerrbakgroente
flinke scheut rijstolie
zakje zwarte bonen saus
1 theelepel 5 spices
1 teen knoflook(door de knoflookpers)
1 sjalot(gesnipperd)
250 gram ei noodles
Bereiding:
Stop het vlees in een schaal, voeg olie, de gesnipperde sjalot, de knoflook en de theelepel 5 spices toe en meng het geheel door elkaar. Laat even rusten. zet pan water op voor de noodles. Verwarm wok of hapjespan en doe het vlees erin. Bak het vlees bruin. Voeg de groente toe bak tot de groenten slinken en beetgaar zijn. Kook de noodles zoals op verpakking vemeld staat.
Voeg de zwarte bonensaus toe aan de vlees en groente. Doe de afgegoten noodles in de pan met de rest. Even goed doorroeren zodat dat alle ingredienten goed door elkaar heen zitten.
Serveer direct.
Eet smakelijk.
Thursday, January 14, 2010
Saltimbocca
Van de week wil de ik eens iets anders eten, ik besloot om Saltimbocca te maken maar met een eigen draai er aan.
Helaas geen foto, die was ik vergeten te maken.
Nou wat heb je nodig? de volgende ingredienten:
4 dunne kipfilets(ala minute lapjes)
8 blaadjes salie
4 plakje parmaham of een andere italiaanse rauwe ham
2 deciliter droge witte wijn
2 deciliter kippenbouillon
olijfolie
klont boter van 50-75 gram
cocktailprikkertjes
kleine ui
Bereiding:
leg op iedere kipfilet een plakje van de ham en 2 salieblaadjes. Bestrooi met
peper en zout. Rol de filets op en zet vast met een cocktailprikker. Snipper de ui fijn, en bak deze 4-5 minuten in de olijfolie in een koekenpan. Voeg daarna de kipfilets toe en bak aan alle kanten bruin. Voeg de wijn en bouillon toe, en laat op matig 4 in ongeveer 20 minuten gaar worden. Neem de Filets uit de pan en voeg aan de saus in de pan, de boeter en wat fijngehalte salie toe. goed bljven roeren tot alle boter gesmolten is en de saus goed warm. Serveer de saus over de filets en eet er haricot vers en gebakken aadappelpartjes bij, of tagliatelle.
Eet smakelijk
Subscribe to:
Posts (Atom)